Monday 1 October 2012

Fails

Didn't really have much time to get up to a lot in the shed this weekend!  However, my bag of bits from proto-pic arrived - Yay!


These components should allow me to combine some wireless motor action on my arduino in a shield free environment. I'm guessing this is the best way to maximise the use of the pins on the board. I'm in control! Will try to get the soldering of the xbee breakout boards done this week.

Still, I had a brief play with H-Bridge motor drivers which brings me to Fail No 1.

I'm keen to see if I can knock up a remote (internet driven) automated door to our chickens. I got the cheapest electric screwdriver that money can buy from Argos.


£6.99 gets you a motor with suitable gearing, a rechargeable battery pack and charger. Plus you get a handy chuck which should make attachement to a spool easier.   Bargain eh?  When asked by the friendly Argos sale person if I'd like to take out insurance on the item, I smiled and thanked them and declined.  Within 10 minutes of getting it home, I had it in bits and was taping up the gearing to stop it falling apart (again).  Warranty violated I fear.

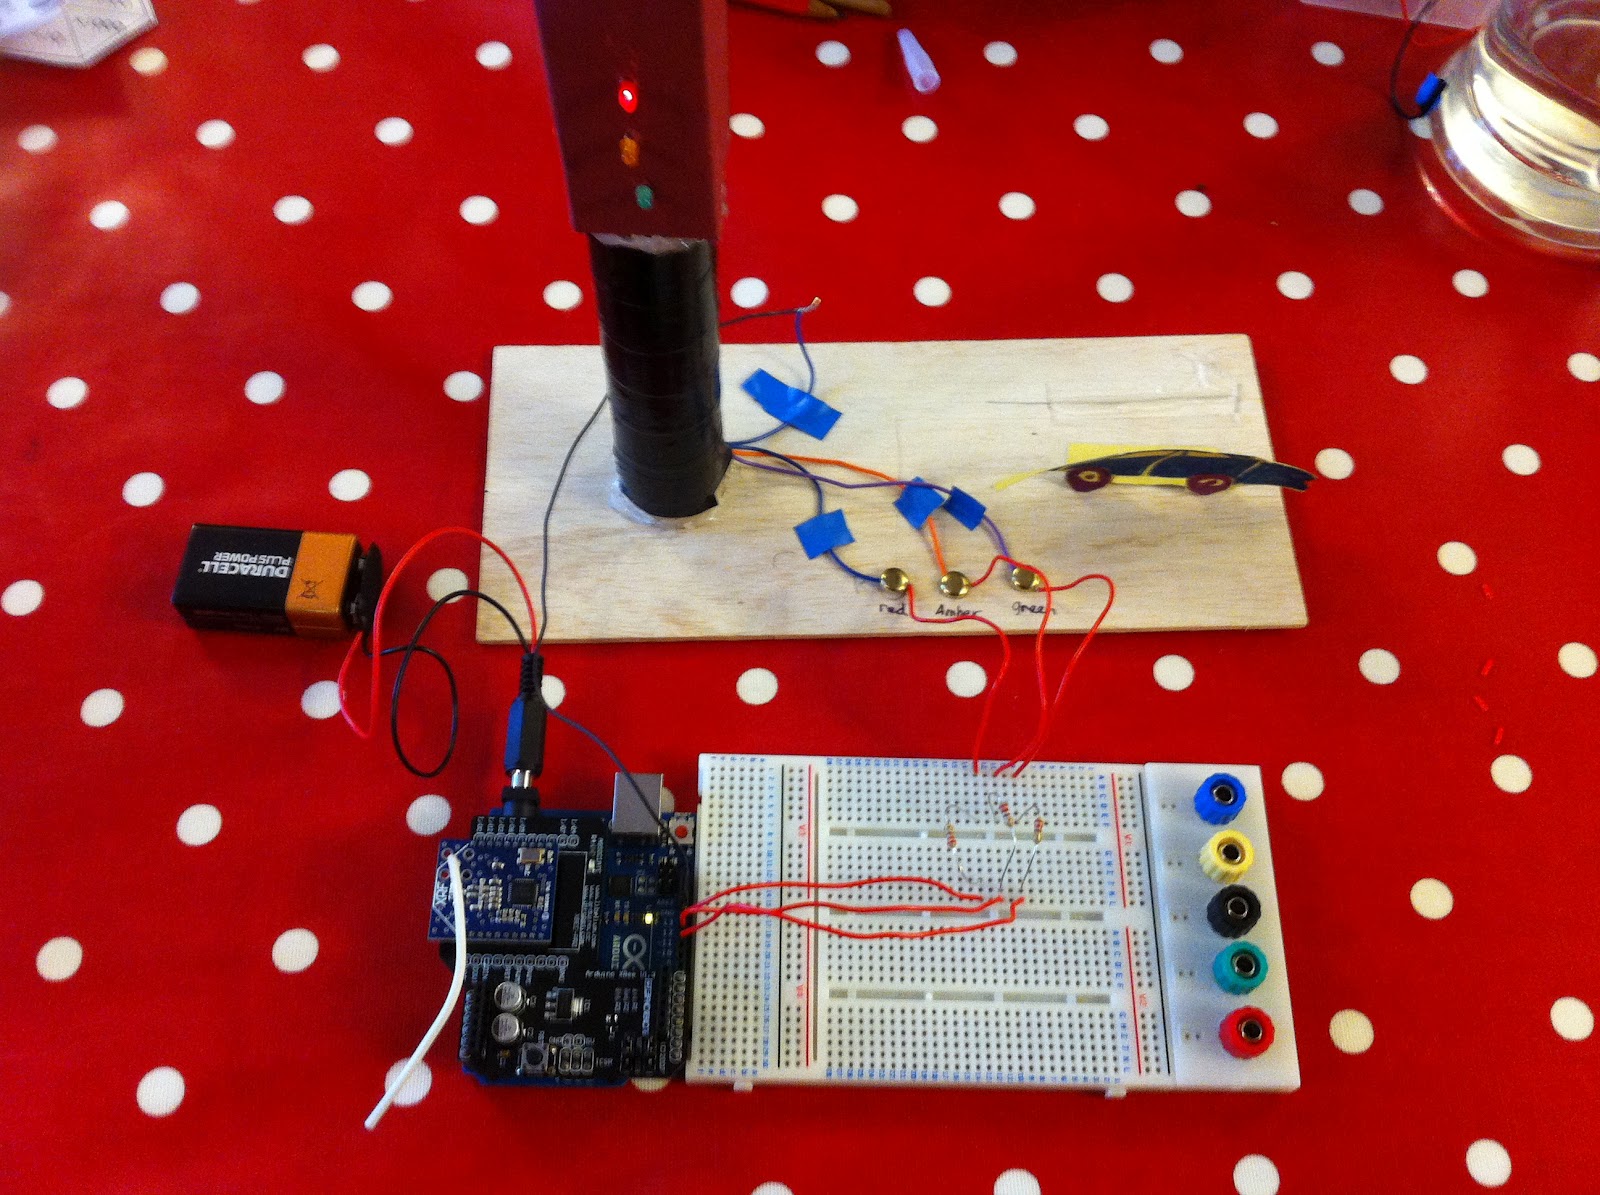
Later on I had a rushed attempt at hooking it up to an H-Bridge and arduino thus:


Feels like I had everything wired up correct but nada from the motor!  Seem to be getting all the right voltages across the pins and devices.  H-Bridge got very hot so something is happening!  Anyway I'll have to come back to it later this week.  Might try a capacitor across the motor and check the voltage is sufficient for the H-Bridge etc.

Fail 2 concerned my investigation of xig.


xig is the open source Xbee Internet Gateway initiated by Rob Faludi who wrote the excellent Building Wireless Sensor Networks I have been reading (see previous post).

xig is an easy way to connect Xbee devices to the internet.  In short, it will let me switch out any Processing UI I concoct for something available anywhere using HTML etc.  You can run it on most platforms (Windows, MacOS and Linux) or you can buy a dedicated device to handle it (a ConnectPort).  I'll be content to get it running on my MacOS server.

Anyway, got it installed but it's so far failed to recognise my radio module.  I think there are probably 2 reasons possible for this, firstly I'm not using a true Xbee device but an XRF lookylikey - not much I can do about that!  Secondly, and this is where I'm hoping the problem lies - I'm yet to configure the radio module to run in API mode.  I can do that - yes I can!  Well that is if the XRF has an API mode...

More later when I get some time.

Monday 24 September 2012

Experiments in wireless (2)

Still waiting for the components to build my breakout boards for the wireless and motors so I've had to content myself with getting the arduino to respond to serial input.  Actually very simple using the serial commands built into the arduino.

I started to rig up some different coloured LEDs on the breadboard when I thought: "traffic light!".  Then as I was rummaging for an amber LED I remembered a school project my eldest daughter had made last year - a set of traffic lights (complete with waiting car)!  So, in the true spirit of recycling (and to give the whole project the hither to missing element of child appeal) I connected up my daughters traffic light project to the arduino thus:


I just added in a couple of 220 ohm resistors to protect the LEDs and then hooked them up to pins 13,12 and 11:


To start with I'm just sent simple signals via a terminal console from my second radio module.  I programmed in a series of commands such as individual on/off, a proper pelican STOP, proper pelican GO and some fancy flashing sequence.

You can see these demonstrated (by my daughter) in the video below:


The (possibly) final stage of this project was to create a more user (child) friendly UI.  I used Processing for the first time to do this.  All I had to was install the serial library and point processing at the right serial port.  I applied my stellar design skills and came up with the following:

Simple point and click.  Unfortunately by now both my daughters had gone to bed so I'll have to wait until tomorrow for some user feedback!

Friday 21 September 2012

Bike! (part2)

Once I got the basic sorted for a single speed, I found that reawakened my love for my old Dawes bike.  I've been riding single speed now for a couple of years with the occasional foray into fixed wheeling.  I've not yet found the courage to ride fixed wheel in London but may soon.

Through a combination of need, experimentation and occasional whimsy I've continued to modify and change my bike until it has reached it's current state.  I *think* that there are now only 3 parts (including the frame) of the original bike.  The other 2 parts are the saddle stem and the handlebar stem.  Everything else has been changed at some point.  Some things like the rear wheel, numerous times.

Here's some of the changes:

New handle bars.  I got a pair of bullhorn bars off of ebay for a good price.  I'd always ridden with bar end extensions before and really enjoyed the additional hand positions they afforded so thought I'd try bullhorns as a progression to this.  After 2 or 3 adjustments in height and angle I have to say I really like them.  They provide about 3 different riding positions that I use regularly for normal, fast and uphill cycling.

I added clips (no straps) to the pedals.  I have ridden clipless for a while using shimano cleats and I might go back to them one day.  The clipless shoes were particular good being stiffer than the ordinary trainers that I used and they dried out much quicker as well which is handy in the winter.  However, with the constant stopping and starting in London, I found myself permanently at the risk of embarrassing falls.  Indeed in the 6 months I where did use cleats I fell off twice (once at the traffic lights in front of a lot of work colleagues).  But, to be fair both falls were in the first couple of months so maybe I was getting better.  Combining a fixed wheel with clipless seems to me to be the height of cycle daring!

I finally got round (about 18 months after fitting the Omega rear wheel) to being able to justify to replace the front one with a matching equivalent.  The old front wheel had done a good many years service and was showing some serious wear on the rim.

I've upgraded both tyres to a much thinner road tyres (Continentals ...) which seems to add to general feeling of smoothness and quiet I get from the bike now.

The saddle is a real hard core razor blade of buttock clenching thinness.  It's a Selle Royale which I again got cheap as it was a test model.  Didn't seem to be anything wrong with it except that it had a big "TEST" sticker on it which has eventually worn away.  It *is* hard and it *is* thin, but I have to say that it is without a doubt the best and most durable saddle I've ever had.  It's outlasted all it's previous incumbents by many years.

Bottom Bracket and Front Forks.


My philosophy towards my bike choices (partly brought about by a reaction to the bells and whistles of the Kona) has become one of urban, gritty minimalism.   Nothing on the bike I don't need.  No mudguards, racks or gears etc.  The only thing I consider every year is the weighing of a minimalist philosophy against the inconvenience of a soggy bottom and back - I may put the mudguards back on.

Tuesday 18 September 2012

I love Lego!


Lego is by far and away the best toy that has ever been made.  I love it.  I have too much of it for a man my age and I spend too much time playing with it.  But what's not to love?  It's indestructible, colourful, easy to use and can take you down endless avenues of invention and creativity.  I've built boats, bridges, houses, robots, pets, cars and spaceships - endless spaceships.   I must have got my first lego set when I was less than 10 and 30+ years later I'm still loving it.  All hail Ole_Kirk_Christiansen!

And I'm definitely an amateur when it comes to being an AFOL (Adult Fan Of Lego).  Take a look at this house and this spaceship to see what the pros are capable of.

Here's a couple of my favorite models that I have built.  Click on the links to see more!

Firstly the family camper van - this is my favorite of all time.  I still can't bring myself to break this one up.   I'm very proud of the green awning.  Press a button inside the roof and some clockwork retracts it. (Plus this is my best lego photography using the home made studio I knocked up - another time...)


Like I say, I have to fight an urge to always build a spaceship.  Here's what happens when I don't resist, the Stealth Fighter.  The photo isn't a deliberate attempt at a retro look, I just hadn't figured out my white balance on the camera at this point :(


Here's a some lego trains I built.  Deliberately retro this time as I was using the first generation - blue era system.


Here are some links to the excellent sites that help me indulge this hobby:

www.peeron.com - an inventory and instruction scan of nearly every lego set ever made.

bricklink.com - the insane world of second hand lego.  Buy a single piece or buy a thousand.

www.mocpages.com - show off the masterpieces you have built.  A great site for inspiration.

Bike! (part 1)

Repairing and maintaining my main commuter bike has been an on and off activity for me for the last 20 years.  About 2 years ago I decided that the bike I'd had for about 17 years was finally past it and I invested (thanks to the Cycle To Work scheme) in a fancy new model.  A Kona Dr Dew.  It had all the bells and whistles a bike can have - pneumatic disk breaks, many many gears and a bell etc.  I added a hub dynamo and german lighting.  But, I never really got on with it.  Too much to go wrong and maintain.  Ultimately, I was really disappointed with it.  I seemed to spend as much time tweaking and fixing it as I did riding it.

A chance discussion with a cyclist friend introduced me to the idea of single speed and fixed wheel cycling.  Suddenly I found myself staring and wondering at the rusting 18 year old bike I had turned my back on.  A wistful nostalgia coupled with an urge to get my hands dirty led me on a 18 month project to rebuild my old bike!

I started with the Dawes Hybrid Synthesis that I had had since 1993 - it would have looked something like this originally (only it was in silver):

Dawes 1993 Synthesis Hybrid
I did a lot of reading of Sheldon Brown's brilliant cycling website and started planning what I needed to  do for a single speed conversion.  The Dawes had horizontal dropouts which was the main requisite for a conversion so all looked good.


To make the conversion work, I essentially had to remove the derailer, the rear gear cassette and replace the chain.  To tidy things up you then remove all the gear cables and on this bike, replace the integrated shifter/brakes with just brakes.  I soon realised that my front chainset was cheap and a single integral piece with the right hand brake.   It was also cracked and deformed, I wanted to be have a clean look with only a single chain ring so I decided to replace the existing integrated chain ring/pedal with separates.  For best results I've found it pays to use a single speed chain.  Normal chains have wider gaps to accomodate the angle in the chain as it moves up down the gears via the derailer.

The next thing I did was head to my local cycle shop.  They were very helpful and sold me a bag of second hand bits cheap.  This got me new brake handles, a new pedal and front chain set.  I ordered a new single speed chain and a flip flop wheel.  This gives the option of swopping between single speed freewheel and single speed speed fixed wheel.

So to work.  Whilst I waited for the chain and wheel I set to work removing the gears and swapping out the pedals.  With my newly acquired pedal removal tool (love a tool) I eventually got my new chain ring and pedal in place.   I felt a nervous excitement as I gutted my bike of it's gear cables and shifter.

Mk1 was ready for testing.  With the chain hooked round a low gear on the cassette I went for my first test ride.  It seemed OK but I wouldn't really know until I got the single speed wheel fitted.

The wheel I had chosen was a Mach 1 Omega rim track wheel from the Raleigh Tru-build range.


The wheel arrived a week later and I fitted it with a single speed freewheel and position it onto the bike.  Getting a good chain line and maintaining chain tension has always been tricky with my frame.   The wheel tends to move in dropout over time and that can lead to the chain coming off.  Recently I put a spacer onto the rear axle which has slightly improved the chain line.  I've also found that I need to retension the chain every couple of months and replace the chain about every 12 months.   If I keep an eye on these then the chain performs pretty well.

Anyway, the bike was ready (and cleaned) for daily use in around April 2010 and I haven't stopped loving it or using it since.   It really has reinvigorated my enjoyment of cycling.  I love single speed and would never go back to gears!  There really is a "clean" and direct feel of cycling with single speed, a better connection with the bike and the road.  It's hard to explain until you've tried it.

Sunday 16 September 2012

Experiments in wireless

A colleague at work has very kindly lent me a pair of Xbee clones - XRF v1.3 plus an explorer board and an Arduino shield.  Armed with a copy of Building Wireless Sensor Networks by Robert Faludi I've now managed to configure them to send a simple serial message to and fro.  I used CoolTerm on a Mac talking to Tera Term on my Windoze server.

What's also become clear to me is that by using all these shields, I'm fast running out of pins on my Arduino.  Certainly using the motor shield uses all but about 2 pins as it's designed to run up to 4 DC motors and a servo at the same time.  So once I get the arduino configured to handle the XRF serial input I'm going to abandon the shields for a while and prototype my own controls using a SN754410 quad half H-bridge chip for motor control and a breakout board for the XRF.  That way, I'm hoping I can manage my pin usage a bit better.  Plus it should look cooler!

Left: XRF on Ardunio + Shield; Right: XRF on explorer board

Sunday 9 September 2012

Robot Boy Mk1

After many run ups and approaches, I've finally gone and built Robot Boy mk1.  Starting with acorns etc. so it doesn't do much yet.  Here's a video:


This is based on an Ardunio Uno, an Adafruit motor shield and the Maker 4WD chassis.

The shield arrives as a bag of components which gave me some much needed soldering practice.  All done and I plugged in some power and a green light came on.  Result!

A week later, I wired in the motors, knocked up a quick sketch for the Ardunio and crossed my fingers.   Rather alarmingly, this time when I gave the shield power no green light.  Somehow I had borked the shield in the intervening week - all it was doing was sitting on a shelf in that time!?!?!  But no, it all worked first time, looks like just a dodgy green LED.

Anyway, this is it so far.  It's supposed to turn a tight square but because some of the motor axles are bit off, it's a bit creative with it's angles.   But I'm pleased with my first version, mainly because my soldering seems to have been OK first time round.

So, what's next?  Some wireless I think.  I'd like an RC mode from a browser.